
How to create a color coded group calendar for SharePoint 2013 Step by Step
 By Vlad Catrinescu Microsoft MVP and MCT · Pluralsight Author
In this blog post I will show you how I was able to create a color coded calendar for a team that wanted to see all the team members and what they have for the next week. We all know that the Out of the box SharePoint Group Calendar in SharePoint 2013 is pretty incomplete, but by using some help from the internet and from SharePoint-Community.net (opens in a new tab) rockstar Paul Choquette, I was able to create something cool for the business. Before I go on, here is what it’s going to look like at the end:
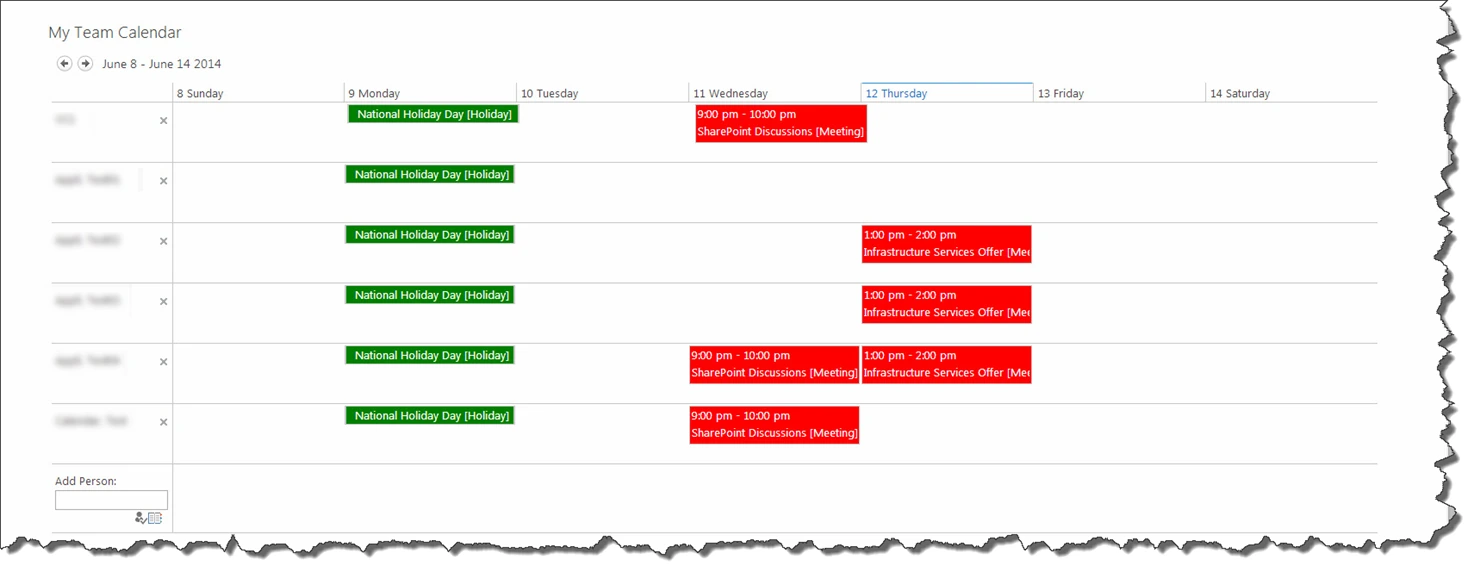
While hoping to do this the most out of the box possible, I encountered several problems that confirm what people have been saying for a while… The group calendar for SharePoint 2013 has the potential to be a great feature, but it isn’t complete! Here are some of the little problems I have been facing while trying to make this work:
- The Group Calendar loses the people selection we have on every refresh!
- No way to add multiple views to this view in order to add colors.
Luckily, it’s easy to add JavaScript to SharePoint to make it work for us! So, the first step I want to do is to create the Group Calendar, Create a SharePoint Page and then add the Group Calendar in it as a Webpart.
Creating the Calendar
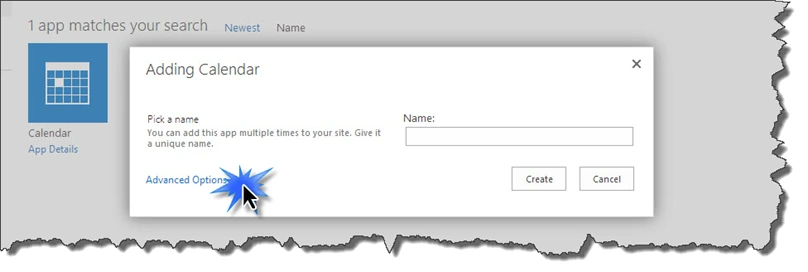
- So first of all, click the wheel button at the top right of the screen and create a new Calendar App. When creating it, make sure you click on the Advanced Options button!
-
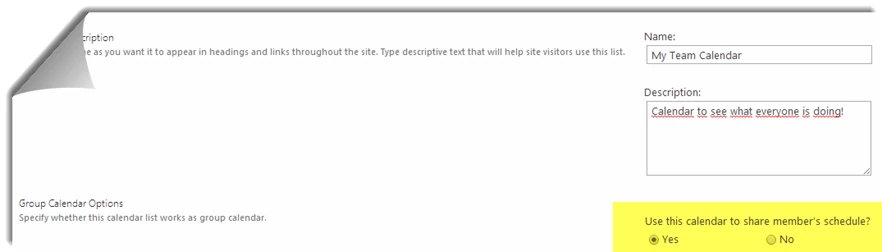
On the Advanced Options Page, make sure you select the “Yes” Radio Button when asked if you want to “Use this calendar to share member’s schedule“
-
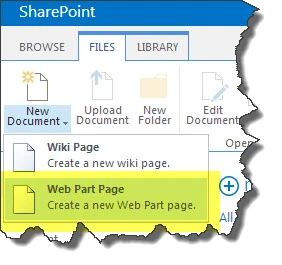
Now go in Site Contents > Site Pages and on the top Files tab , create a new document of type Web Part Page. Choose what layout you wish, I chose the Full Page, Vertical
-
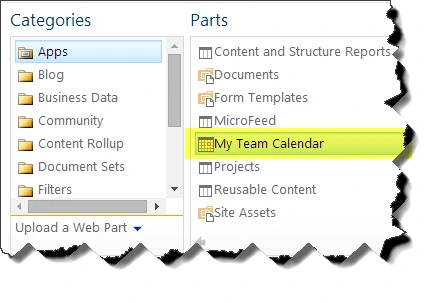
When you get on the new WebPart Page, click the “Add a WebPart” button, and in the Apps category, you will find the Name of your Team Calendar you created in Step 1!
-
So now, you should have a page looking like this one:
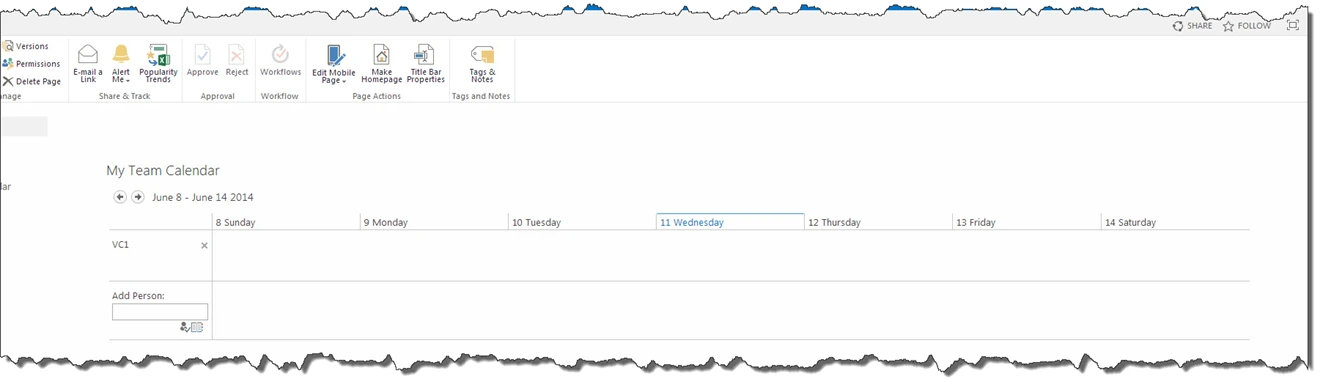
Now, try to add an event to yourself! Well… try is the good word because by default it will not appear in this view even if we told SharePoint we wanted a Group Sharing Calendar! In order to be able to see people on this Calendar, we will need to add the “Attendees” Column. This is also the good occasion to customize your columns. I will show you how to put up the attendees column, but the rest of the customizing is up to you!
-
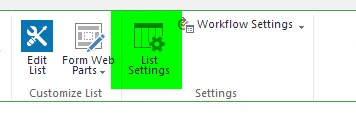
First, go in your Team Calendar and click on the List Settings button at the top right.
-
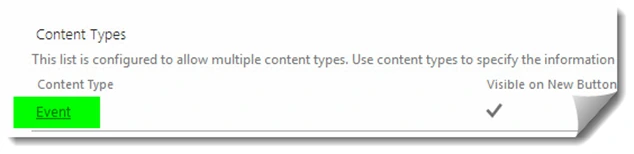
In the List Settings page, you will have a Content Type Section with the Event Content Type in it. Click on the Event Content Type!
-
At the bottom of the page, after all the columns, click on the “_Add from existing site or list columns”
_link.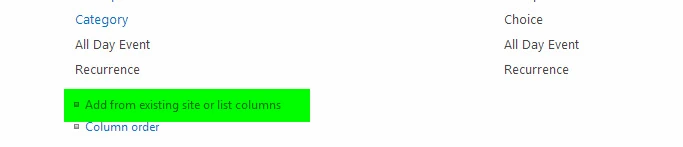
-
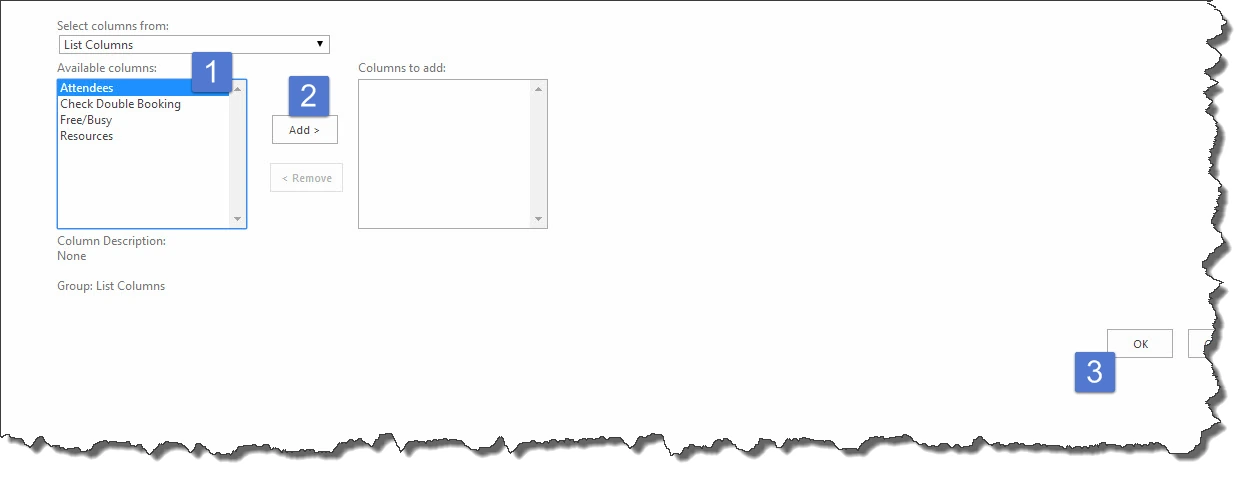
Highlight the Attendees Column from the left list box and click on the Add Button! It will then transfer to the right and then click OK!
-
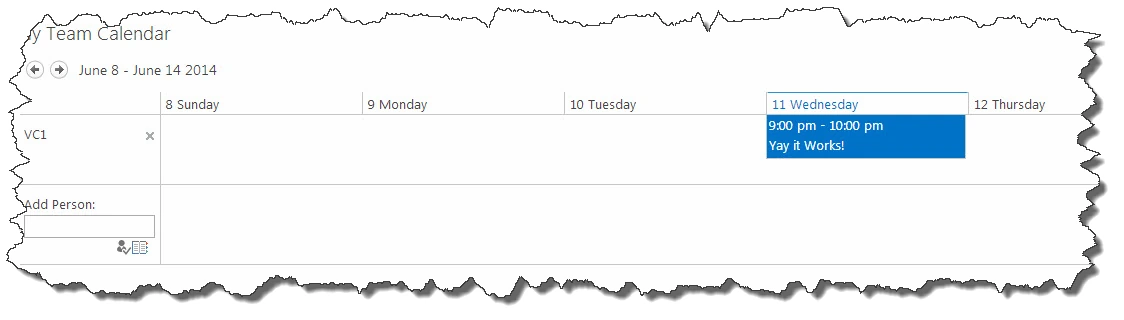
Now go back to your Calendar, add a new event and put yourself as an attendee! You should now see your event appear in the calendar!
Automatically Adding Users
Good but now, I only see myself! I will add other persons using the “Add Person” on the button and then SharePoint will remember my choices and will display them to everyone right? Unfortunately notL. Every time you go to your page/Calendar, it will only show yourself and no one else. Fortunately, Mohamed M Malek (opens in a new tab) from Microsoft posted a blog post (opens in a new tab) on the solution. I will write the step by step here, which is mostly copied with 1 correction from his blog post, however all the credit for this approach and script go to him and not to me! If you want to see how he did it and how he engineered the script, make sure you read his blog post (opens in a new tab). If you just want to get it working, continue readingJ.
My advice: Before starting to do this section, I advise you to read the step by step entirely and see how it works. It will allow you to make wise decisions from the begging on how you want to add persons in the calendar. Personally, I created a SharePoint Group called “Team Calendar Members” that will contain all the members I want to add to the calendar. I created a new group with no permissions, since all my permissions are handled with AD Groups, and this calendar isn’t able to see inside AD GroupsL.
-
Download Fiddler over here > http://www.telerik.com/fiddler (opens in a new tab) . Fiddler is a web debugging proxy that also allows you to record traffic! I know for some of the beginners in SharePoint this might sound like a scary and complicated tool, however, I will guide you through how to use it step by step.
-
Open a new Internet explorer Window and go to your Calendar Page. Only have that site open in the internet explorer window. Also, Open Fiddler.
-
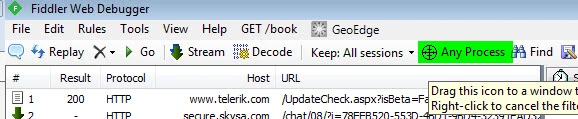
In Fiddler, Click on the “Any Process” button, and drag the “target” on the Internet Explorer Window we just opened.
-
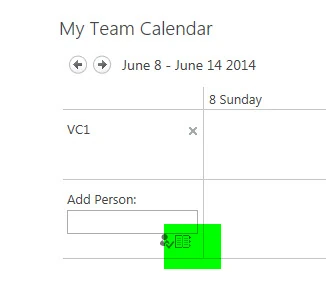
In Internet Explorer, on the SharePoint Page, click on the “User Directory” Button in the “Add Person” section.
-
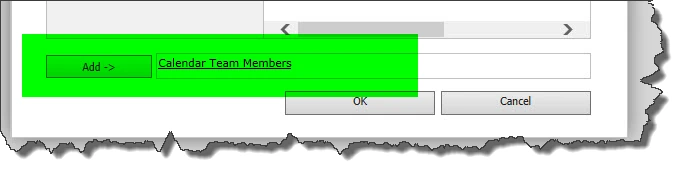
In the “Add ->” Section at the button, add all the users you want to add that want to appear on the calendar. Add them all in there, but do not press ok yet! In my case, I added the Calendar Team Members SharePoint Group. Do not add Active Directory groups in it, it will not work!
-
Before Pressing Ok, go in Fiddler and Remove All Past entries. This will make it easier for us to find the one we need!

-
Now, click on the OK button! In the browser, you will see that all the users you selected will be added to the calendar. In Fiddler you will get a bunch of new entries!
-
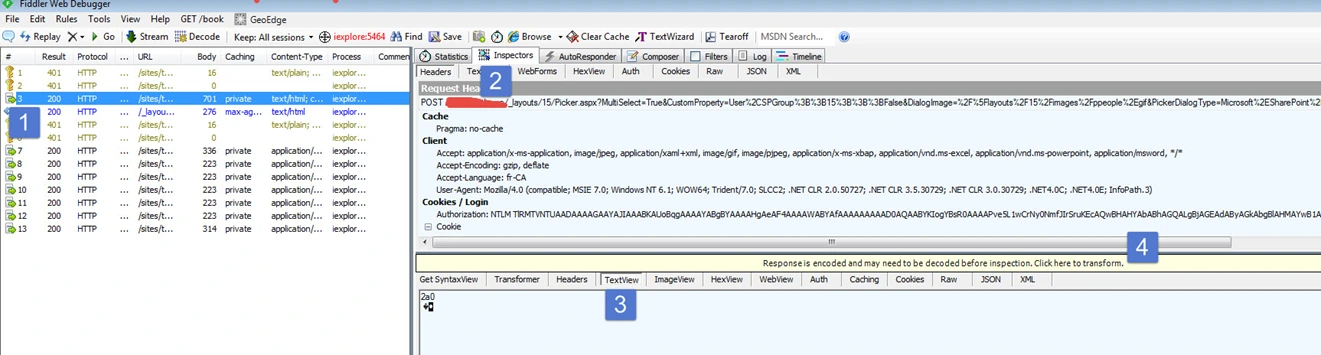
In Fiddler, go in the first result that has a “200” Result (second column) (1) . Then make sure on the top tab you are in the Inspectors tab (2) and then in the bottom tab, make sure you are in the TextView Tab (3). Afterwards, click on the “Response is encoded and may need to be decoded before inspection| yellow bar (4).
-
You will now see actual text in that box. Copy all the text from that box starting from “var ret =” and ending at “u003e’;” Like in the following picture. Save the text in a notepad!

-
While still on the calendar page, open Internet Explorer Developer tools by pressing F12. On the left side, select the Dom Explorer (red circle and the select the “Select element” option (yellow highlight)

-
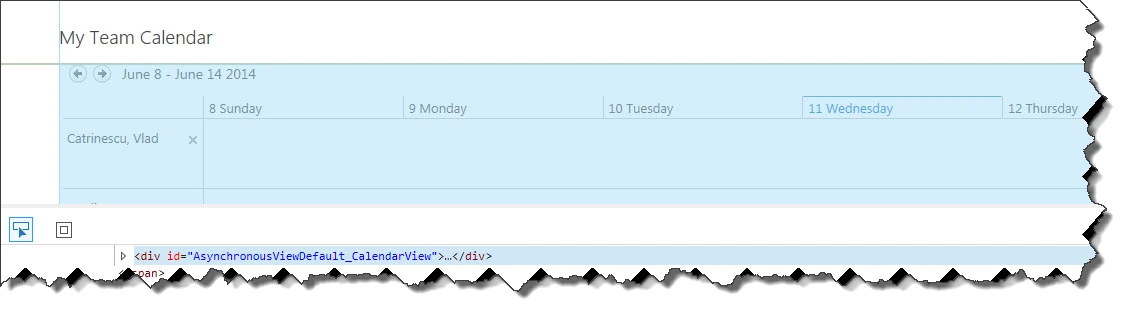
Position your mouse at the top left of the calendar, until the whole calendar is in a blue highlighted color!
-
Then go in the Source explorer in the bottom and expand the node you are in! You will see an ID that looks something like WPQ3. This ID will appear in a lot of places, so it shouldn’t be hard to find! Save that ID into a notepad file!
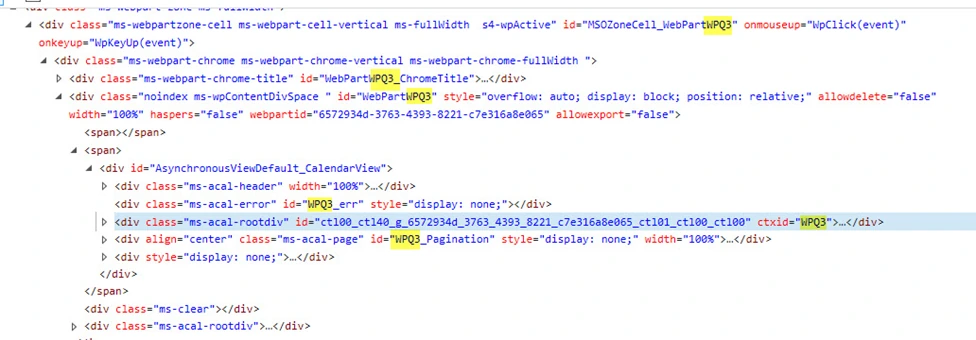
-
Now, copy paste this script in a notepad file.
<script type="text/javascript">
function _firstTime() {
//need to select the calendar tab so we can override the onlick method on some of the buttons.
SelectRibbonTab('Ribbon.Calendar.Calendar', true);
//give the ribbon time to load
setTimeout('_doWireUp();',2000);
}
function _doWireUp()
{
//change the onclick event for the group buttons to make sure it reloads our default group
var weekElem = document.getElementById('Ribbon.Calendar.Calendar.Scope.WeekGroup-Large');
if(weekElem)
weekElem.onclick = function() {setTimeout('_setDefaultResources();',1000);return false;};
var dayElem = document.getElementById('Ribbon.Calendar.Calendar.Scope.DayGroup-Large');
if(dayElem)
dayElem.onclick = function() {setTimeout('_setDefaultResources();',1000);return false;};

_setDefaultResources();
}

function _setDefaultResources() {

// Paste the Var Ret from Step 9 over here:
    var ret ='\u003cEntities c…………………………………………………………………………………………………………..\u002fEntities\u003e';

// Replace the WPQ3 from the next line with the ID you got in Step 12!

        var sel = SP.UI.ApplicationPages.CalendarSelector.instance().getSelector(1, 'WPQ3');
        sel.selectEntities(ret, true);
}

ExecuteOrDelayUntilScriptLoaded(_firstTime, "sp.ribbon.js");
</script>
6. So, to give you an idea, this is how mine looks like:
<script type="text/javascript">
function _firstTime() {
//need to select the calendar tab so we can override the onlick method on some of the buttons.
SelectRibbonTab('Ribbon.Calendar.Calendar', true);
//give the ribbon time to load
setTimeout('_doWireUp();',2000);
}
function _doWireUp()
{
//change the onclick event for the group buttons to make sure it reloads our default group
var weekElem = document.getElementById('Ribbon.Calendar.Calendar.Scope.WeekGroup-Large');
if(weekElem)
weekElem.onclick = function() {setTimeout('_setDefaultResources();',1000);return false;};
var dayElem = document.getElementById('Ribbon.Calendar.Calendar.Scope.DayGroup-Large');
if(dayElem)
dayElem.onclick = function() {setTimeout('_setDefaultResources();',1000);return false;};

_setDefaultResources();
}

function _setDefaultResources() {

// Paste the Var Ret from Step 9 over here:
    var ret ='\u003cEntities Append=\u0022True\u0022 Error=\u0022\u0022 DoEncodeErrorMessage=\u0022True\u0022 Separator=\u0022;\u0022 MaxHeight=\u00223\u0022\u003e\u003cEntity Key=\u0022Calendar Team Members\u0022 DisplayText=\u0022Calendar Team Members\u0022 IsResolved=\u0022True\u0022 Description=\u0022Calendar Team Members\u0022\u003e\u003cExtraData\u003e\u003cArrayOfDictionaryEntry xmlns:xsd=\u0022http:\u002f\u002fwww.w3.org\u002f2001\u002fXMLSchema\u0022 xmlns:xsi=\u0022http:\u002f\u002fwww.w3.org\u002f2001\u002fXMLSchema-instance\u0022\u003e\u003cDictionaryEntry\u003e\u003cKey xsi:type=\u0022xsd:string\u0022\u003eSPGroupID\u003c\u002fKey\u003e\u003cValue xsi:type=\u0022xsd:string\u0022\u003e21\u003c\u002fValue\u003e\u003c\u002fDictionaryEntry\u003e\u003cDictionaryEntry\u003e\u003cKey xsi:type=\u0022xsd:string\u0022\u003eAccountName\u003c\u002fKey\u003e\u003cValue xsi:type=\u0022xsd:string\u0022\u003eCalendar Team Members\u003c\u002fValue\u003e\u003c\u002fDictionaryEntry\u003e\u003cDictionaryEntry\u003e\u003cKey xsi:type=\u0022xsd:string\u0022\u003ePrincipalType\u003c\u002fKey\u003e\u003cValue xsi:type=\u0022xsd:string\u0022\u003eSharePointGroup\u003c\u002fValue\u003e\u003c\u002fDictionaryEntry\u003e\u003c\u002fArrayOfDictionaryEntry\u003e\u003c\u002fExtraData\u003e\u003cMultipleMatches \u002f\u003e\u003c\u002fEntity\u003e\u003c\u002fEntities\u003e';

// Replace the WPQ3 from the next line with the ID you got in Step 12!

        var sel = SP.UI.ApplicationPages.CalendarSelector.instance().getSelector(1, 'WPQ3');
        sel.selectEntities(ret, true);
}
ExecuteOrDelayUntilScriptLoaded(_firstTime, "sp.ribbon.js");
</script>-
Now go to your Webpart page, edit the page and add a script Editor Webpart!
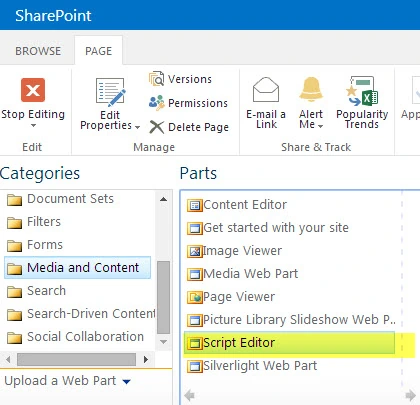
-
Click on the Edit Snippet link, and add the script you created in Step 14!

-
Then close it, save the page, and make sure you navigate to it again! (Site Content > Pages > your page). All the users you selected should now automatically load!
Color Coding the Calendar
Ok, now that we have all the users we want added to the calendar, we got to color code events, to make it easier for people to see items on a calendar! This whole section was made possible with the help of Paul Choquette. Paul is a JavaScript guru and most of all an important member of SharePoint-Community.net! He is often online and helping people with JavaScript questions! So, here is how we did it!
-
First of all, I needed to get the category of my event in the title of the event! This was both for easy to see purposes, and the technical purpose in the background was to be able to get the category in the HTML tags on the calendar! So, what I did was create a Calculated Column in the Calendar called “CalendarTitle“. The Forumula I used for it was =Title&” [“&Category&”]” . So for example if someone creates a event of type Meeting with the title “SharePoint Discussion” , the column will equal > “SharePoint Discussion [Meeting]“
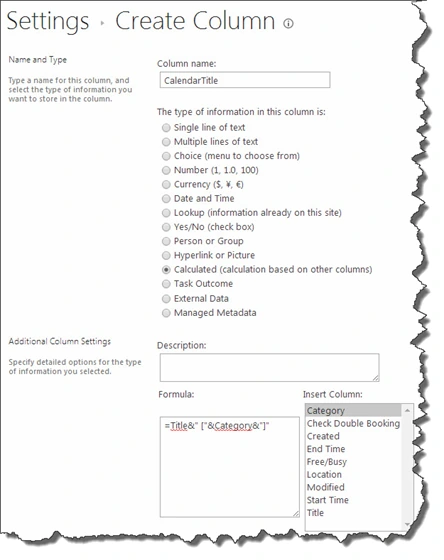
-
Now we will go back to the Calendar and will click on the Modify View button!
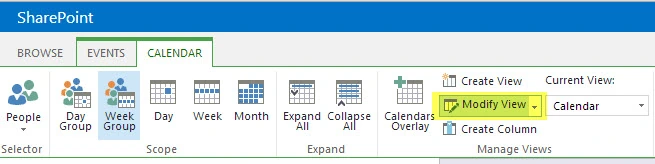
-
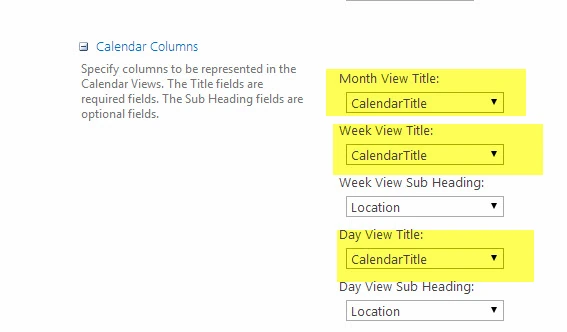
In the Calendar Columns Section, we will modify the Month,Week and Day view title to show our new column “CalendarTitle” instead of just the Title. The entries in the Calendar will now look something like this:
-
Ok, so now it looks something like this:. You can see the Category in the title!

-
But we still don’t got colors! That’s where Javascript comes in! We will insert this part of code between the place where we inserted our WebPart ID and the “ExecuteDelayUntil Script Loaded. To give you an idea of where it’s placed, it’s right here:
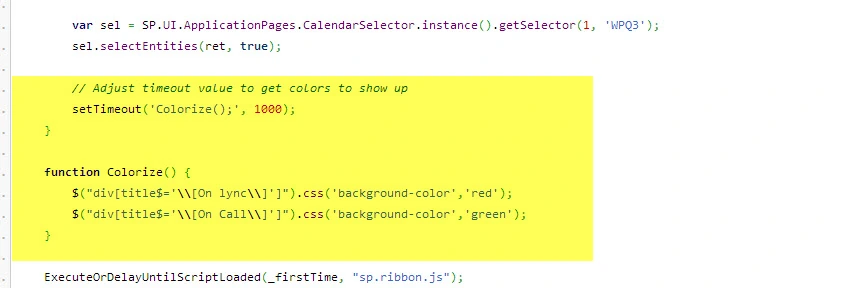
// Adjust timeout value to get colors to show up setTimeout('Colorize();', 1000); } // Be careful this bracket already exists! Do not add an extra one! function Colorize() { $("div[title$='\\[Meeting\\]']").css('background-color','red'); $("div[title$='\\[Holiday\\]']").css('background-color','green'); }You will notice that in the part I did, I setup Meetings to be in Red, and Holiday to be in Green. For more categories, you just copy paste those lines and edit the category and color! , Also, at the end of the script, add the following line:
<script src="http://code.jquery.com/jquery-1.11.0.min.js"></script>- To make it a bit more clear for you, here is my final Javascript>
<script type="text/javascript"> function _firstTime() { //need to select the calendar tab so we can override the onlick method on some of the buttons. SelectRibbonTab('Ribbon.Calendar.Calendar', true); //give the ribbon time to load setTimeout('_doWireUp();',2000); } function _doWireUp() { //change the onclick event for the group buttons to make sure it reloads our default group var weekElem = document.getElementById('Ribbon.Calendar.Calendar.Scope.WeekGroup-Large'); if(weekElem) weekElem.onclick = function() {setTimeout('_setDefaultResources();',1000);return false;}; var dayElem = document.getElementById('Ribbon.Calendar.Calendar.Scope.DayGroup-Large'); if(dayElem) dayElem.onclick = function() {setTimeout('_setDefaultResources();',1000);return false;}; _setDefaultResources(); } function _setDefaultResources() { // Paste the Var Ret from Step 9 over here: var ret ='\u003cEntities Append=\u0022True\u0022 Error=\u0022\u0022 DoEncodeErrorMessage=\u0022True\u0022 Separator=\u0022;\u0022 MaxHeight=\u00223\u0022\u003e\u003cEntity Key=\u0022Calendar Team Members\u0022 DisplayText=\u0022Calendar Team Members\u0022 IsResolved=\u0022True\u0022 Description=\u0022Calendar Team Members\u0022\u003e\u003cExtraData\u003e\u003cArrayOfDictionaryEntry xmlns:xsd=\u0022http:\u002f\u002fwww.w3.org\u002f2001\u002fXMLSchema\u0022 xmlns:xsi=\u0022http:\u002f\u002fwww.w3.org\u002f2001\u002fXMLSchema-instance\u0022\u003e\u003cDictionaryEntry\u003e\u003cKey xsi:type=\u0022xsd:string\u0022\u003eSPGroupID\u003c\u002fKey\u003e\u003cValue xsi:type=\u0022xsd:string\u0022\u003e21\u003c\u002fValue\u003e\u003c\u002fDictionaryEntry\u003e\u003cDictionaryEntry\u003e\u003cKey xsi:type=\u0022xsd:string\u0022\u003eAccountName\u003c\u002fKey\u003e\u003cValue xsi:type=\u0022xsd:string\u0022\u003eCalendar Team Members\u003c\u002fValue\u003e\u003c\u002fDictionaryEntry\u003e\u003cDictionaryEntry\u003e\u003cKey xsi:type=\u0022xsd:string\u0022\u003ePrincipalType\u003c\u002fKey\u003e\u003cValue xsi:type=\u0022xsd:string\u0022\u003eSharePointGroup\u003c\u002fValue\u003e\u003c\u002fDictionaryEntry\u003e\u003c\u002fArrayOfDictionaryEntry\u003e\u003c\u002fExtraData\u003e\u003cMultipleMatches \u002f\u003e\u003c\u002fEntity\u003e\u003c\u002fEntities\u003e'; // Replace the WPQ3 from the next line with the ID you got in Step 12! var sel = SP.UI.ApplicationPages.CalendarSelector.instance().getSelector(1, 'WPQ3'); sel.selectEntities(ret, true); // Adjust timeout value to get colors to show up setTimeout('Colorize();', 1000); } function Colorize() { $("div[title$='\\[Meeting\\]']").css('background-color','red'); $("div[title$='\\[Holiday\\]']").css('background-color','green'); } ExecuteOrDelayUntilScriptLoaded(_firstTime, "sp.ribbon.js"); </script> <script src="http://code.jquery.com/jquery-1.11.0.min.js"></script>-
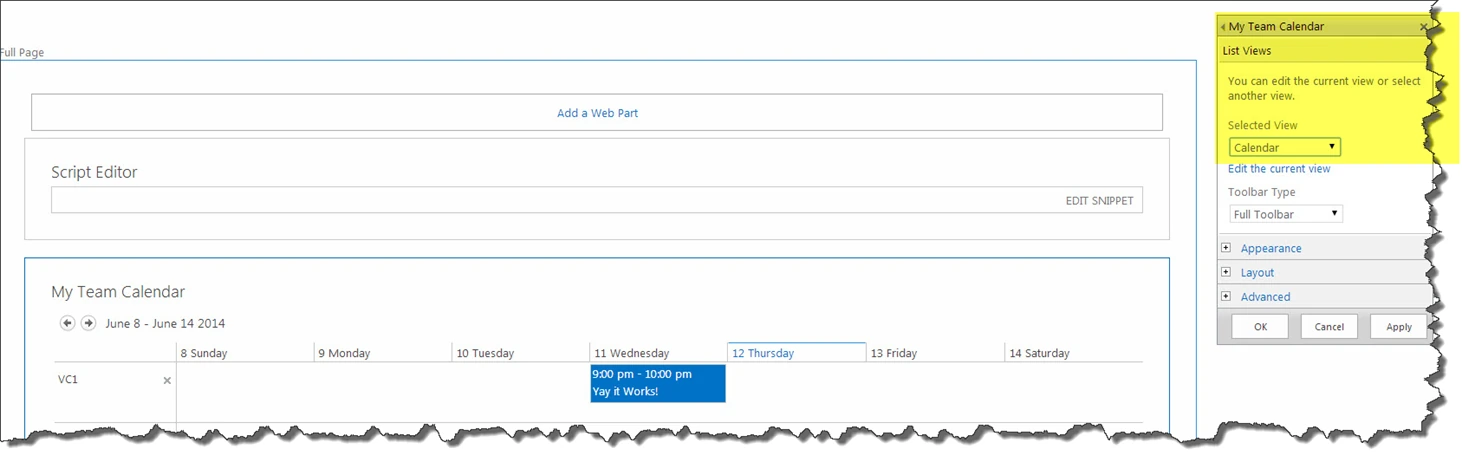
Now go add this code in your Team Calendar Page! You might notice that the CalendarTitle column doesn’t show in the page, but you still see the old version! Edit the WebPart and select the Calendar view!
-
So now when you go back to the page, it will look something like this:

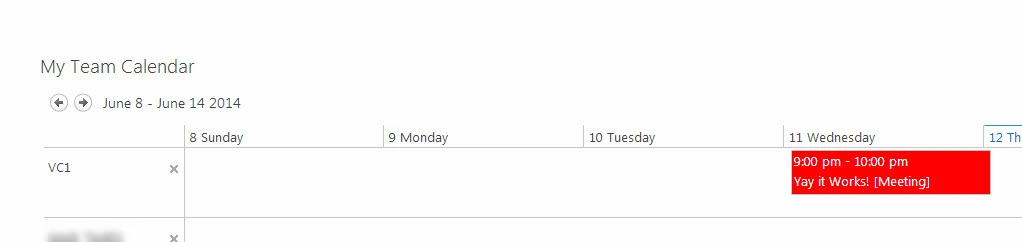
Our Colors work!
While this isn’t the best way of doing this type of calendar and it has a lot of Javascript and client side coding, it gets the job done and it can easily be done by a power user!

